Why does concrete flooring crack? Nearly every slab develops some form of cracking over its lifetime. The cause typically traces back to mix design errors, poor curing practices, ground movement beneath the slab, or loads that exceed the original design capacity. Understanding these triggers helps you prevent costly damage and protect your investment for decades.
Tucson homeowners ask this question more often than most. Our Sonoran Desert climate swings from triple-digit summer heat to near-freezing winter nights, and that extreme thermal stress punishes poorly prepared slabs. Add the expansive clay soils common throughout southern Arizona, and you’ve got conditions that can produce visible cracks within months of a new installation.
This guide breaks down every major cause of cracking in residential and commercial floors, the distinct types of cracks you might encounter, and proven prevention strategies that actually work in our arid climate.
How Mix Design Causes Concrete Flooring to Crack
A poorly proportioned batch is one of the top reasons slabs fail early. The water-to-cement ratio controls almost everything about the finished strength of your slab. Too much water makes the mix easier to pour but dramatically increases shrinkage as that excess moisture evaporates during curing.
The ideal water-to-cement ratio for most residential flatwork sits between 0.40 and 0.50. Go above 0.55 and problems become almost inevitable. Each extra gallon of water per cubic yard can reduce compressive strength by 200 to 500 psi, which directly increases the likelihood of cracking under normal service loads.
Aggregate selection matters just as much. Rounded river gravel produces a more workable mix, while angular crushed stone creates stronger mechanical bonds between particles. For Tucson projects, locally sourced aggregate that has been washed and graded properly gives the best results because it meets regional material standards and performs well under desert temperature extremes.
One mistake I see repeatedly on residential pours: the crew adds water on-site to make the mix flow easier, especially on hot days when the material starts setting in the truck. That convenience costs you long-term durability. If workability is a concern, a plasticizer admixture is far safer than extra water because it improves flow without weakening the cured slab.
- A water-to-cement ratio above 0.55 increases shrinkage cracking risk by roughly 40%
- Insufficient cement content reduces particle cohesion and tensile strength throughout the slab
- Wrong aggregate size or type weakens the bond between cement paste and stone
- Chemical admixtures like plasticizers and retarders help maintain workability without adding water
Why Rapid Drying and Poor Curing Crack Concrete Floors
Curing is the chemical process where cement and water react to form calcium silicate hydrate, the compound responsible for a slab’s structural strength. Cut that process short and the surface hardens faster than the interior, creating internal tension that pulls the top layer apart.
In Tucson, ambient temperatures regularly exceed 100 degrees Fahrenheit from June through September. Relative humidity often drops below 15%. Both conditions accelerate moisture loss from freshly poured surfaces at rates that can cause plastic shrinkage cracking within the first two to four hours after placement.
Proper curing for desert conditions involves keeping the surface moist for a minimum of seven days. Techniques that produce the best results in our climate include:
- Apply a liquid curing compound immediately after finishing. This membrane slows evaporation by up to 75%, giving the material time to develop adequate strength before moisture loss becomes critical.
- Cover the slab with wet burlap or polyethylene sheeting if ambient temperatures exceed 90 degrees Fahrenheit during the curing window.
- Schedule pours for early morning or late afternoon to avoid peak heat exposure during the critical first hours when the surface is most vulnerable to rapid drying.
- Use windbreaks on exposed slabs. Even moderate wind speeds of 10 to 15 mph significantly increase surface evaporation rates and accelerate the onset of plastic shrinkage cracks.
The American Concrete Institute (ACI), the leading authority on industry standards and construction practices, recommends maintaining surface moisture for at least seven days for standard mixes and up to 14 days for high-performance applications. Skipping this step is the single most preventable cause of early cracking in residential slab work.
Temperature Swings and Thermal Stress on Concrete Slabs in Tucson
Every material expands when heated and contracts when cooled. A typical slab moves roughly 0.0055 inches per 10 feet for every 10-degree Fahrenheit change in temperature. That sounds insignificant until you realize Tucson can see a 40-degree temperature swing in a single day during spring and fall.
Thermal cracking happens when the tensile stress from expansion or contraction exceeds the slab’s tensile strength. Slabs poured directly on dark soil absorb more heat during the day and cool faster at night, amplifying the stress cycle. Garage floors and outdoor patios are especially vulnerable because they receive direct sunlight with no insulation buffer between the surface and the subgrade.
Control joints (sometimes called contraction joints) are the primary defense against thermal movement in slab flooring. These pre-cut grooves create intentional weak points where the slab can crack in a straight, predictable line rather than randomly across the surface. Proper spacing for a 4-inch residential slab ranges from 8 to 12 feet on center, though Tucson’s extreme temperature range often calls for the tighter end of that spacing to minimize random cracking between joints.
Applying a protective coating adds another layer of thermal defense. If you’re curious about surface protection strategies that stand up to desert UV exposure and thermal cycling, our guide to how long concrete coatings last covers the options that perform best in this climate.
Overloading and Structural Stress That Cracks Concrete Floors
Residential slabs are typically designed for live loads between 40 and 100 pounds per square foot, depending on the application. Garage floors need to handle vehicles weighing 4,000 to 6,000 pounds distributed across four tire contact patches. Place a car lift, heavy workshop equipment, or a fully loaded storage rack in a garage designed only for standard vehicle loads, and you’re exceeding the design capacity of your floor.
Point loads create the most damage. A standard 4-inch slab can handle 50 psf spread evenly, but a heavy safe or machine tool concentrating 2,000 pounds on a 12-by-12-inch footprint creates localized stress of roughly 140 psf. That’s nearly three times the residential design load, and it will crack the slab if it doesn’t have reinforcement beneath it.
Signs that overloading is causing problems in your floor:
- Cracks radiating outward from the load point in a starburst pattern, indicating the slab has exceeded its flexural capacity
- Depression or settlement directly under heavy equipment where the subgrade has compressed
- Cracking along the slab edge where it meets a wall or foundation, showing the base has compressed unevenly beneath the slab
The fix depends on severity. Sometimes redistributing the load across a larger bearing plate is enough. Other situations call for structural repair methods like epoxy injection or partial slab replacement. Our page on foundation repair methods explains the techniques we use when structural cracking has gone beyond cosmetic concern.
Why Missing Reinforcement Leads to Cracking
Reinforcement is a steel or fiber framework embedded in the slab that adds tensile strength. Plain, unreinforced slabs rely entirely on the cured mix to resist tension, and the tensile strength of a standard residential mix is only about 10% of its compressive strength. That gap is the fundamental weakness that reinforcement addresses.
Three common reinforcement approaches for residential and light commercial concrete flooring:
| Reinforcement Type | Best Application | Tensile Strength Boost | Approximate Cost |
|---|---|---|---|
| Welded wire mesh (WWF 6×6) | Standard residential slabs, patios | Moderate (holds cracks tight) | $0.10 to $0.20 per sq ft |
| Rebar grid (#3 or #4 bars) | Garage floors, driveways, structural slabs | High (prevents propagation) | $0.50 to $1.50 per sq ft |
| Fiber reinforcement (polypropylene or steel fibers) | Overlays, thin slabs, decorative pours | Moderate (reduces plastic shrinkage) | $0.15 to $0.40 per sq ft |
Here’s the detail most guides skip: reinforcement doesn’t prevent cracking. It controls it. Steel rebar and mesh hold the two sides of a crack together so the slab continues functioning as a single structural unit. Without reinforcement, a crack can widen over time, allow moisture penetration, and eventually compromise the subgrade beneath it.
For a deeper look at how common causes of deterioration compound over time when reinforcement is missing, that resource covers the full lifecycle of slab degradation from initial cracking through structural failure.
Subgrade Problems and Soil Movement Under Concrete Slabs
The subgrade is the compacted soil or gravel base directly beneath a slab. If that base settles unevenly, shifts laterally, or wasn’t compacted properly during construction, the slab loses uniform support and bends until it fractures.
Tucson sits on a mix of alluvial deposits, caliche, and expansive clay soils. Caliche is a calcium carbonate layer common throughout southern Arizona that creates a hard pan capable of supporting a slab well when left intact. But when a contractor breaks through caliche during excavation and backfills with loose material, that spot becomes a void waiting to settle and crack the floor above it.
Expansive clays are the bigger headache for Tucson homeowners. These soils absorb water from monsoon rains or irrigation runoff and swell by as much as 10% in volume. When they dry out, they shrink. That cyclical movement pushes and pulls on the slab from below, creating stresses the slab was never designed to handle.
Proper subgrade preparation includes:
- Remove all organic material and topsoil from the building pad to eliminate soft spots that settle over time.
- Compact the native soil to at least 95% of modified Proctor density using a plate compactor or roller.
- Place a 4-inch minimum layer of clean, compacted gravel as a capillary break between soil and slab to block upward moisture migration.
- Install a vapor barrier (10-mil polyethylene minimum) over the gravel before pouring to prevent moisture from degrading the slab from below.
Skipping the vapor barrier is a common shortcut in Tucson residential work. The reasoning goes that our climate is so dry it doesn’t matter. That’s wrong. Soil moisture migrates upward through capillary action regardless of ambient humidity, and over time it degrades the bond between slab and subgrade, promoting cracking and delamination.
After 20 years of working on Tucson projects, the pattern is consistent: homes built on properly prepared subgrades with vapor barriers rarely show structural cracking, while homes where the builder cut corners on base preparation develop problems within five to ten years. The subgrade is invisible once the slab is poured, which makes it the easiest place for a builder to save money and the hardest place for a homeowner to verify quality after the fact.
5 Types of Cracks Found in Concrete Flooring
Not every crack signals the same problem. Identifying the type tells you the root cause and dictates which repair approach will actually fix it rather than just mask the symptom.
Hairline Cracks in Concrete Floors
Hairline cracks measure less than 1/16 inch wide and typically appear within the first year after the pour. Normal drying shrinkage causes them as the material reaches its final moisture equilibrium. These are cosmetic, not structural. An epoxy or polyurethane sealant fills them effectively and prevents moisture from reaching any embedded rebar.
Plastic Shrinkage Cracks
These form while the surface is still fresh, usually within one to four hours after placement. They look like short, parallel lines running across the slab. Hot, dry, or windy conditions cause the surface to lose moisture faster than bleed water can replace it, and the resulting tension tears the plastic surface apart. Proper wind protection and immediate application of curing compound prevent nearly all plastic shrinkage cracking.
Crazing on Concrete Floor Surfaces
Crazing is a network of fine, shallow surface cracks that resemble a spider web or shattered glass. Widths range from about 1/50 to 1/10 of an inch. The cause is almost always premature finishing. Troweling the surface before bleed water has fully risen traps moisture beneath a sealed top layer. When that trapped water eventually evaporates, the surface layer shrinks and crazes. Resurfacing with a cement-based overlay or applying a protective concrete coating can restore both appearance and durability.
Expansion and Contraction Cracks
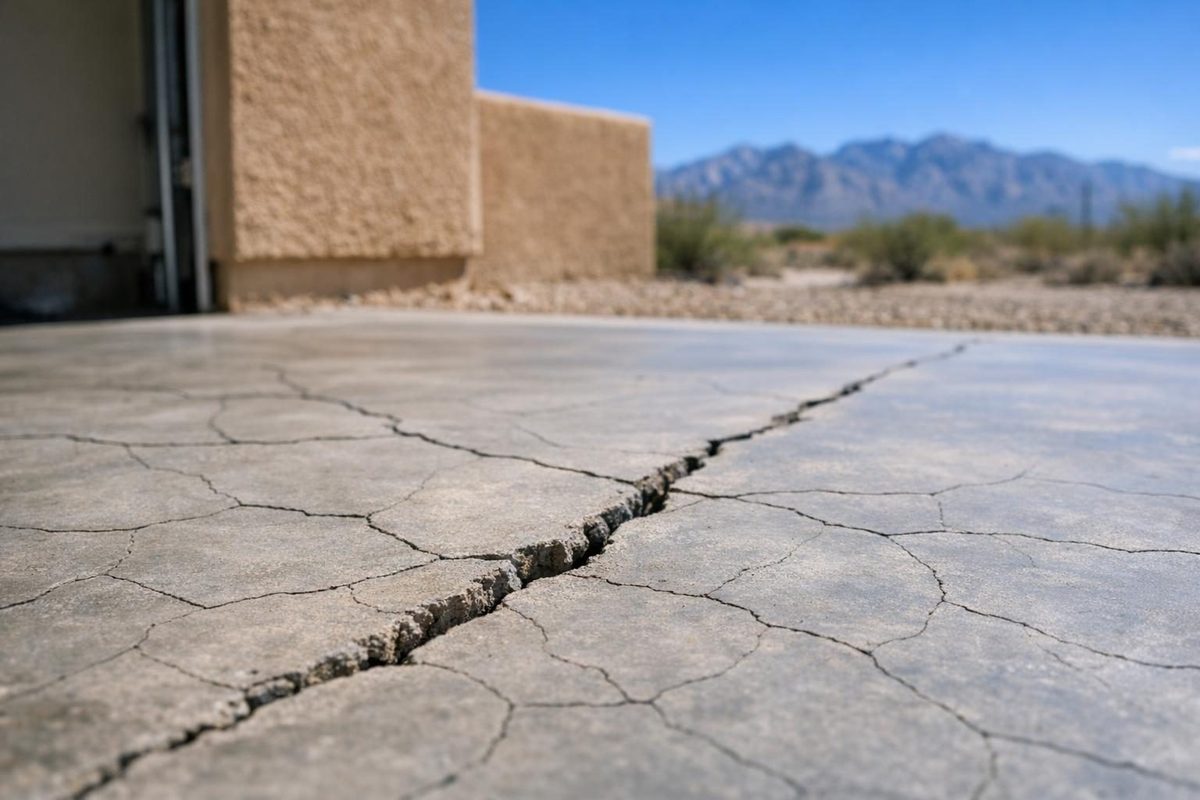
Wider cracks measuring several millimeters or more that form along slab edges, near columns, or where the slab meets a wall usually trace back to thermal movement or soil settlement. These penetrate the full depth of the slab and pose genuine structural concerns. Repair involves routing out the crack, cleaning the channel, and filling with a flexible epoxy or polyurethane injection material that moves with the slab through temperature cycles.
Structural Cracks in Concrete
Structural cracks range from 3mm to 9mm wide, often appear as deep grooves on one side of the slab, and sometimes extend through the full thickness. They indicate a serious problem: foundation settlement, overloading beyond design capacity, or catastrophic subgrade failure beneath the floor. Professional repair assessment and cost evaluation is the right first step before deciding between patching and full replacement.
Prevention Strategies for Concrete Flooring in Desert Climates
Preventing cracks comes down to controlling three variables: the mix design, the curing environment, and the subgrade preparation. Get all three right and you’ll have a slab that lasts 30 to 50 years with minimal maintenance.
Specify the Right Concrete Mix
Use a minimum 3,500 psi compressive strength for residential interior floors and 4,000 psi for garage floors and exterior slabs. Keep the water-to-cement ratio at 0.45 or lower. Use air entrainment if the slab will be exposed to freeze-thaw cycles. Yes, parts of Tucson see freezing temperatures in December and January, and unprotected slabs can spall after repeated cycles.
Cut Control Joints at Proper Spacing
Saw-cut control joints within 6 to 18 hours of placement, before random shrinkage cracks form. Joint depth should be at least one-quarter of the slab thickness. In a 4-inch slab, that means a 1-inch minimum cut depth. Space joints at intervals no greater than 2 to 3 times the slab thickness in feet. For a 4-inch slab, that translates to 8 to 12 feet between joints.
Cure Properly for Arid Conditions
Apply curing compound within 30 minutes of finishing the surface. If you use wet curing with burlap or sheeting, maintain contact for seven full days. Do not remove coverings during the hottest part of the day, as sudden temperature change on a freshly cured surface can trigger thermal shock cracking that would otherwise never develop.
Reinforce Every Slab
Even a simple patio benefits from welded wire mesh or fiber reinforcement. The cost is minimal compared to the expense of repairing or replacing a cracked, unreinforced slab five years later. For garage floors and any slab carrying point loads, #3 rebar on 18-inch centers provides solid crack control at a reasonable price point.
Prepare the Subgrade Before Pouring
Compact the base, install a gravel capillary break, and place a vapor barrier. In areas with known expansive soils, a geotechnical report before construction can identify problem zones and recommend targeted preparation like lime stabilization or over-excavation and backfill with engineered fill material.
Once the slab is in place, consistent concrete flooring maintenance extends its service life substantially. Sealing surfaces every three to five years, keeping drains clear to prevent water pooling, and addressing minor cracks before they grow are the basics that separate a 20-year slab from a 50-year slab.
When to Call a Professional About Cracked Concrete Flooring
Homeowners who ask why does concrete flooring crack often discover the answer only after damage has progressed beyond a simple fix. Small hairline cracks are normal and you can seal them yourself with a tube of crack filler from any hardware store. Anything wider than 1/8 inch, any crack that continues growing over time, or any crack accompanied by uneven settlement warrants professional evaluation from an experienced contractor.
A simple decision framework for evaluating cracks in concrete flooring:
- If the crack is less than 1/16 inch and stable, seal it with a flexible filler and monitor annually for any changes in width or length.
- If the crack is between 1/16 and 1/8 inch, fill with flexible sealant and check for movement every six months to catch progression early.
- If the crack exceeds 1/8 inch or shows vertical displacement where one side sits higher than the other, get a structural assessment from a licensed contractor.
- If multiple cracks form a radiating pattern from a single point, that suggests a subgrade or overloading problem requiring professional investigation and possibly core sampling.
Ignoring structural cracks doesn’t save money. Water intrusion through an open crack erodes the subgrade, accelerates rebar corrosion, and turns a $500 concrete repair into a $5,000 full replacement within a few years. In Tucson, monsoon season delivers intense bursts of rain that find every unsealed crack and accelerate the damage cycle.
Frequently Asked Questions About Why Concrete Flooring Cracks
Can you prevent all cracks in concrete flooring?
No slab is completely crack-proof. Proper mix design, adequate curing, control joints, and reinforcement reduce cracking dramatically, but some hairline shrinkage cracking is normal as the material reaches its final moisture equilibrium. The goal is controlling where cracks form (at joints) and keeping them structurally insignificant.
How long after pouring does cracking typically appear?
Plastic shrinkage cracks can appear within hours of placement. Drying shrinkage cracks in concrete flooring usually show up within the first 30 days. Settlement cracks from subgrade issues may not appear for months or even a year after the pour, especially if seasonal soil movement is involved.
Are cracks in garage concrete floors normal?
Minor hairline cracks in garage floors are extremely common and generally not a structural concern. Vehicle loads, thermal cycling from opening and closing the garage door, and the thinner slabs used in some older Tucson homes make small cracking almost inevitable. Fill them with a flexible sealant to prevent moisture penetration and monitor for any growth over time.
Does sealing concrete flooring prevent future cracking?
Surface sealers protect against moisture penetration, staining, and surface wear, but they don’t prevent structural or shrinkage cracking. A sealer is a maintenance tool, not a crack prevention tool. Prevention comes from proper mix design, curing, reinforcement, and joint placement during the original construction of the concrete floor.
What causes cracks to appear in Tucson winters?
Tucson winters bring overnight lows in the 30s and daytime highs in the 60s. That 30-plus-degree daily swing causes repeated expansion and contraction cycles. Slabs without adequate control joints or those poured on uncompacted soil are most susceptible to winter thermal cracking.
How much does it cost to repair cracked concrete floors?
Simple crack sealing for hairline issues costs $1 to $3 per linear foot using DIY materials. Professional epoxy injection runs $5 to $15 per linear foot. Full slab replacement for severely damaged sections of concrete flooring ranges from $6 to $12 per square foot in the Tucson market, depending on access, demolition requirements, and whether the subgrade needs reworking.
Now you know why does concrete flooring crack and what drives each type of failure. Start by inspecting your floors for any cracks wider than a hairline and note their location, width, and whether one side sits higher than the other. If everything looks minor, pick up a sealant and address each crack before monsoon season brings moisture into the equation. For anything structural or for slabs showing a pattern of worsening damage, have a Tucson Concrete Flooring contractor evaluate the situation and provide a free, no-obligation quote for repair or replacement.